While I first published this article on AVSForum (where I first heard of the Spatial Audio Calibration Toolset disc and digital download) I meant for it to be posted on QQ as well, as many folks have embraced spatial (or immersive) audio in the past year or more. Codecs like Dolby Atmos and Auro-3D are becoming a go-to for mixers and recording studios. I will detail a little more on SACT later.
First, a quick preamble. I built a 7.1.4 immersive theater in my newly finished lower level in our home in the Denver area. I had heard of Atmos music (and especially The Beatles Abbey Road coming out in Atmos, detailed in these pages) back a few years ago, and so had heights/tops/ceiling speakers in the design from day one. My initial design had Atmos (only) in mind when I placed the ceiling speakers at their normal Atmos positions (typically 45 degrees and 135 degrees vertically from the main listening position). But then I heard great immersive mixes from Morten (2L) and others, being done in Auro-3D, and figured I could get both formats to sound as they should.
Well, I finally finished my Atmos/Auro-3D height/tops ceiling overhaul project. As I posted elsewhere earlier on, i had the very nice and value-conscious SVS Prime Elevations at approx 45 and 135 vertically on my 9.3 ft ceiling, and the effect was awesome. It was my first attempt at height/top speakers (and immersive formats) and it worked out very well.......until I heard the better immersive mixes and realized that the height layer is just as important as the bed layer!! Tonality, timbre, whatever you want to call it, the height layer demanded identical speakers to my bed layer! And therein lies the rub....I can't hang Aerial 20Ts (or even Aerial LR5s) up there, let alone afford two sets of them. But there was hope. I found the wonderful Aerial 5Ts, and with some help from Michael Kelly (founder and designer) and a used pair on the web, i was able to grab two sets of Aerial 5Ts and go to work.
As mentioned I wanted to do the SVS to Aerial swap...but also....as I said I had become a real fan of Auro-3D playback and bought into their 30 degree placement ideas. The ceiling was tall enough, and the room was "small" enough that I was hoping the widening of ceiling placement (from 45 degrees to 30 degrees, and the same in the rears) would not create a "hole" in the 90 degrees above me space for Atmos flyovers, etc. (Note: I used some of the SACT tools and the Dolby Helicopter demo to ensure the front-to-back pans were ok).
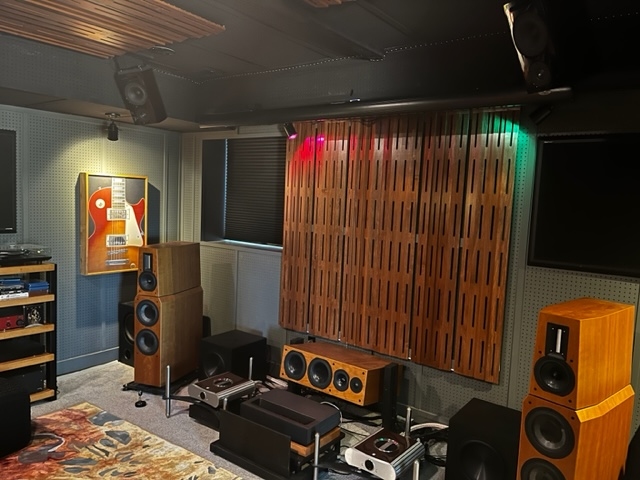
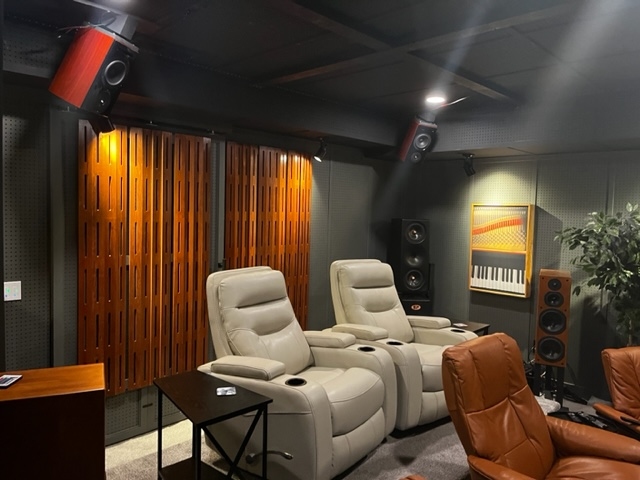
After a couple attempts at using Amazon-bought ceiling brackets (hung wayyy too low) my master carpenter and I engineered four ceiling mounted wedges (fronts had slightly different angle than rears) that did the trick, and allowed for some toe-in or toe-out horizontal adjustments. Here is a pic of the front soundstage (120" screen is retracted for audio-only listening) and rear of the room (overexposed to show detail at the ceiling; in normal use the black ceiling is gone to the ether)


At first listen the immersive effects were mixed blessings. The fidelity took a huge jump forward, but the precision of the immersive effects were different, and a sort of two steps forward, maybe one-two steps back. But I did not illicit the infamous buyers remorse, mainly because I knew that so much had changed (new speakers, new locations, new definitions/classifications of heights vs tops) I really needed to rerun a complete RoomPerfect (Lyngdorf's room correction system) again, measuring in 7 spots randomly around the room until RP "knows" 95%+ of the room. And a quick backup just in case.
A first listen to the new calibrated room was a major step forward. Fidelity, space, decay, musicality...everything sounded much better. It was now time to break out the Spatial Audio Calibration Toolkit (SACT) and see where I stood.
Stop! What the hell is SACT? Well, I was perusing AVSForum one day and found a thread about it. A couple of home theater youtube content providers (joentell, Channa aka Techno Dad) had embraced the concept of immersive music so much that they decided to produce both a BluRay disc and a set of digital downloads that contain a plethora of test tones, voice-driven torture tests, etc. They had discovered that state-of-the-art home three dimensional playback required not only a fairly OCD-level of placement (especially when all speakers are not nearly identical) but also an adherence to the same principles we worked on in 2 channel.....imaging and depth...except now we have exponentially more speaker interactions. To get it working is fairly simple, to get it to sound its best takes special tools. Hence, the SACT.
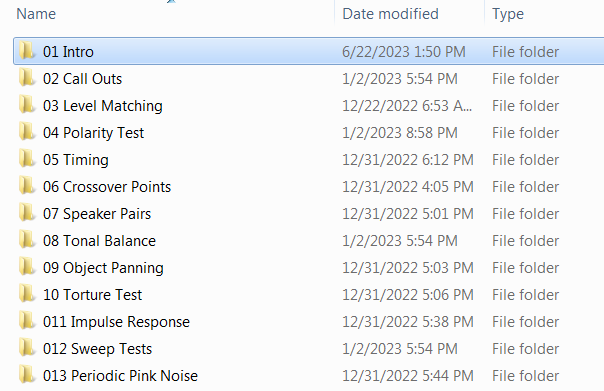
Here is a sample of the chapters.

Before I did this I wanted some clarification on a few tips that a power user named TheReverendSlim points out on his wonderfully necessary document called "Bubble of Sound Using SACT". That document, a quick chat into the reverend, my trusty RatShack SPL meter and the MKV update from SACT (played through my Zidoo Z9X) was all I assumed I needed to assess my room, and maybe clear up any anomalies. Maybe?? That's pretty funny......if your are tired of reading...the punchline is that the document and SACT software are worth their weight in gold, and are absolutely necessary tools to get your immersive room to sound its best. It's laughable, really.
OK, back to the details. In my opinion, you need to follow the bubble doc to a tee, first starting with Channa's youtube video if you need help using Chapter 3 - Level Matching. Pick the correct level-matching video in Chapter 3, depending on your setup (mine was the 7.1.4 MKV). Spend a good amount of time doing this, which will require some back and forth, and with some processors/AVRs the process can be a little kludgy, what having to reset channel trims, save, get out and rerun the video section you were just listening to. If your processor has a web interface the process is slightly better.
Note: I spent 5 minutes (only) using the Polarity chapter (don't worry that it is 9.1.6 only) and make sure your speakers (especially the first time) are wired correctly.
Once you've got everything leveled, run a few torture tests (the document walks you through it) to hear if your ears agree with the SPL readings. If not, use your ears as final judge and maybe bump up the section of your room that is behind you, since your ears may perceive a drop off back there where the microphone didn't.
Then move on to the section of SACT that, IMHO, is worth the price of admission...and then some. This section is called Chapter 7 - Speaker Pairs (you'll find youtube videos on all this if googled). By using it, as per the reverend, my allbeit-already-hi-end immersive experience went up a massive 50%!! It is glorious now; I mean glorious. I get specific side wall imaging, overhead imaging, front soundstage imaging all over the place. It's crazy how much a few delay inches makes in the perceived overall presentation. And don't worry if the distances are not exactly correct (as measured by your laser, steel tape or whatever) because the bottom line is the final result. And it's not necessarily intuitive, so try to increase or decrease in large chunks and hear the result, then back it off incrementally. It should almost "lock" in when you find the right number.
The first notes of my demo go-to's (American Beauty, 19 Masters, xPropaganda, Magnificat, etc etc) were all I needed. Whether Atmos or Auro-3D, the effect was a "got junk" tv commercial, where all these spaghetti wires and cobwebs and confusing aural pans and object movements..were instantaneously removed and replaced with a crystal clear bubble of precise imaging and musicality to go on forever. I continue, now, to marvel at what 24/48 can offer when the music is allowed to breathe, have space, and often excite with well-done immersive mixes. And for that reason alone, I applaud hirez audiophiles and this wonderful forum environment for embracing lowly 24/48 after talking hirez for years.....because 24/48 (and 24/96 for Auro-3D) is actual high resolution...whether slightly compromised via streaming, or full blown lossless via bluray discs or downloads. The end goal of high rez is to hear the performance in all its glory, at the best possible sample or bit rate Well, we've achieved that in spades.
The Spatial Audio Calibration toolkit should now include the Bubble doc as part of the instructions, and should be bought by EVERYONE who has an Atmos or other immersive format setup. EVERYONE! It's that good.
A thank you to the wonderful Michael Kelly and his team at Aerial Acoustics for making such beautiful and musical speakers.
A special thanks to the authors (Joe, Channa and Jeremy) for their patience and commitment to immersive audio. This is a good time to be an audio lover.
First, a quick preamble. I built a 7.1.4 immersive theater in my newly finished lower level in our home in the Denver area. I had heard of Atmos music (and especially The Beatles Abbey Road coming out in Atmos, detailed in these pages) back a few years ago, and so had heights/tops/ceiling speakers in the design from day one. My initial design had Atmos (only) in mind when I placed the ceiling speakers at their normal Atmos positions (typically 45 degrees and 135 degrees vertically from the main listening position). But then I heard great immersive mixes from Morten (2L) and others, being done in Auro-3D, and figured I could get both formats to sound as they should.
Well, I finally finished my Atmos/Auro-3D height/tops ceiling overhaul project. As I posted elsewhere earlier on, i had the very nice and value-conscious SVS Prime Elevations at approx 45 and 135 vertically on my 9.3 ft ceiling, and the effect was awesome. It was my first attempt at height/top speakers (and immersive formats) and it worked out very well.......until I heard the better immersive mixes and realized that the height layer is just as important as the bed layer!! Tonality, timbre, whatever you want to call it, the height layer demanded identical speakers to my bed layer! And therein lies the rub....I can't hang Aerial 20Ts (or even Aerial LR5s) up there, let alone afford two sets of them. But there was hope. I found the wonderful Aerial 5Ts, and with some help from Michael Kelly (founder and designer) and a used pair on the web, i was able to grab two sets of Aerial 5Ts and go to work.
As mentioned I wanted to do the SVS to Aerial swap...but also....as I said I had become a real fan of Auro-3D playback and bought into their 30 degree placement ideas. The ceiling was tall enough, and the room was "small" enough that I was hoping the widening of ceiling placement (from 45 degrees to 30 degrees, and the same in the rears) would not create a "hole" in the 90 degrees above me space for Atmos flyovers, etc. (Note: I used some of the SACT tools and the Dolby Helicopter demo to ensure the front-to-back pans were ok).
After a couple attempts at using Amazon-bought ceiling brackets (hung wayyy too low) my master carpenter and I engineered four ceiling mounted wedges (fronts had slightly different angle than rears) that did the trick, and allowed for some toe-in or toe-out horizontal adjustments. Here is a pic of the front soundstage (120" screen is retracted for audio-only listening) and rear of the room (overexposed to show detail at the ceiling; in normal use the black ceiling is gone to the ether)


At first listen the immersive effects were mixed blessings. The fidelity took a huge jump forward, but the precision of the immersive effects were different, and a sort of two steps forward, maybe one-two steps back. But I did not illicit the infamous buyers remorse, mainly because I knew that so much had changed (new speakers, new locations, new definitions/classifications of heights vs tops) I really needed to rerun a complete RoomPerfect (Lyngdorf's room correction system) again, measuring in 7 spots randomly around the room until RP "knows" 95%+ of the room. And a quick backup just in case.
A first listen to the new calibrated room was a major step forward. Fidelity, space, decay, musicality...everything sounded much better. It was now time to break out the Spatial Audio Calibration Toolkit (SACT) and see where I stood.
Stop! What the hell is SACT? Well, I was perusing AVSForum one day and found a thread about it. A couple of home theater youtube content providers (joentell, Channa aka Techno Dad) had embraced the concept of immersive music so much that they decided to produce both a BluRay disc and a set of digital downloads that contain a plethora of test tones, voice-driven torture tests, etc. They had discovered that state-of-the-art home three dimensional playback required not only a fairly OCD-level of placement (especially when all speakers are not nearly identical) but also an adherence to the same principles we worked on in 2 channel.....imaging and depth...except now we have exponentially more speaker interactions. To get it working is fairly simple, to get it to sound its best takes special tools. Hence, the SACT.
Here is a sample of the chapters.

Before I did this I wanted some clarification on a few tips that a power user named TheReverendSlim points out on his wonderfully necessary document called "Bubble of Sound Using SACT". That document, a quick chat into the reverend, my trusty RatShack SPL meter and the MKV update from SACT (played through my Zidoo Z9X) was all I assumed I needed to assess my room, and maybe clear up any anomalies. Maybe?? That's pretty funny......if your are tired of reading...the punchline is that the document and SACT software are worth their weight in gold, and are absolutely necessary tools to get your immersive room to sound its best. It's laughable, really.
OK, back to the details. In my opinion, you need to follow the bubble doc to a tee, first starting with Channa's youtube video if you need help using Chapter 3 - Level Matching. Pick the correct level-matching video in Chapter 3, depending on your setup (mine was the 7.1.4 MKV). Spend a good amount of time doing this, which will require some back and forth, and with some processors/AVRs the process can be a little kludgy, what having to reset channel trims, save, get out and rerun the video section you were just listening to. If your processor has a web interface the process is slightly better.
Note: I spent 5 minutes (only) using the Polarity chapter (don't worry that it is 9.1.6 only) and make sure your speakers (especially the first time) are wired correctly.
Once you've got everything leveled, run a few torture tests (the document walks you through it) to hear if your ears agree with the SPL readings. If not, use your ears as final judge and maybe bump up the section of your room that is behind you, since your ears may perceive a drop off back there where the microphone didn't.
Then move on to the section of SACT that, IMHO, is worth the price of admission...and then some. This section is called Chapter 7 - Speaker Pairs (you'll find youtube videos on all this if googled). By using it, as per the reverend, my allbeit-already-hi-end immersive experience went up a massive 50%!! It is glorious now; I mean glorious. I get specific side wall imaging, overhead imaging, front soundstage imaging all over the place. It's crazy how much a few delay inches makes in the perceived overall presentation. And don't worry if the distances are not exactly correct (as measured by your laser, steel tape or whatever) because the bottom line is the final result. And it's not necessarily intuitive, so try to increase or decrease in large chunks and hear the result, then back it off incrementally. It should almost "lock" in when you find the right number.
The first notes of my demo go-to's (American Beauty, 19 Masters, xPropaganda, Magnificat, etc etc) were all I needed. Whether Atmos or Auro-3D, the effect was a "got junk" tv commercial, where all these spaghetti wires and cobwebs and confusing aural pans and object movements..were instantaneously removed and replaced with a crystal clear bubble of precise imaging and musicality to go on forever. I continue, now, to marvel at what 24/48 can offer when the music is allowed to breathe, have space, and often excite with well-done immersive mixes. And for that reason alone, I applaud hirez audiophiles and this wonderful forum environment for embracing lowly 24/48 after talking hirez for years.....because 24/48 (and 24/96 for Auro-3D) is actual high resolution...whether slightly compromised via streaming, or full blown lossless via bluray discs or downloads. The end goal of high rez is to hear the performance in all its glory, at the best possible sample or bit rate Well, we've achieved that in spades.
The Spatial Audio Calibration toolkit should now include the Bubble doc as part of the instructions, and should be bought by EVERYONE who has an Atmos or other immersive format setup. EVERYONE! It's that good.
A thank you to the wonderful Michael Kelly and his team at Aerial Acoustics for making such beautiful and musical speakers.
A special thanks to the authors (Joe, Channa and Jeremy) for their patience and commitment to immersive audio. This is a good time to be an audio lover.
Last edited:


