


Continues from my post on the new 8th generation NUCs: https://www.quadraphonicquad.com/forums/index.php?threads/intel-nuc-8th-generation-thumbs-up.25638/
An Intel 8th generation NUC makes an ideal, relatively low cost media player. Its really small (4"/100mm square) has HDMI output and both wireless/Ethernet (1GBE LAN) connection, can be controlled remotely over you wifi network or via a 3rd party wireless or infrared remote control. NUCS support multichannel 192/24 7.1 audio and can play DTS-HDMA/TrueHD/Atmos audio via HDMI passthrough to an AVR and can play 4K UHD/1080p HD video.
NUCs come as a 'barebones' box. You will need to also buy memory and a small 'hard drive' (actually it will be a solid sate SSD drive - extreme speed). This is the recommended configuration which you can buy at Amazon or your local PC hardware store, this is the exact configuration I ordered:
https://www.amazon.com/gp/aws/cart/....3=B07BN5FJZQ&Quantity.3=1&add.x=127&add.y=26
There's no software included. You would need to install Windows (license required) or you can install LibreElec/Kodi (free). The latest LibreElec/Kodi Leia version now supports Hires Multichannel audio from FLAC.
If you plan to use LibreElec/Kodi I'd recommend purchasing a Minix Neo A2 air/gyroscopic mouse/remote (wifi) too. Amazon sells those for around $25. Here's all the bits including the Minix remote (memory at front, SSD drive, NUC at back).
https://www.amazon.com/MINIX-Keyboard-Six-Axis-Gyroscope-Technology/dp/B016OABW8S
EDIT: If you do use LibreElec it has iOS (iPhone/iPad) and Android smartphone/tablet remote control apps you can use via your home wifi to control the media player, select next tracks while listening to current etc. JRiver has similar apps for Windows and smartphones/tablets too. I don’t know about Foobar compatible remotes.

Once you've got everything you'll need a small Phillips head screwdriver to assemble the memory and drive.
This is my recommended
STEP 1: Install NUC components (NUC, memory and disc drive)
1. Turn the NUC upside down:
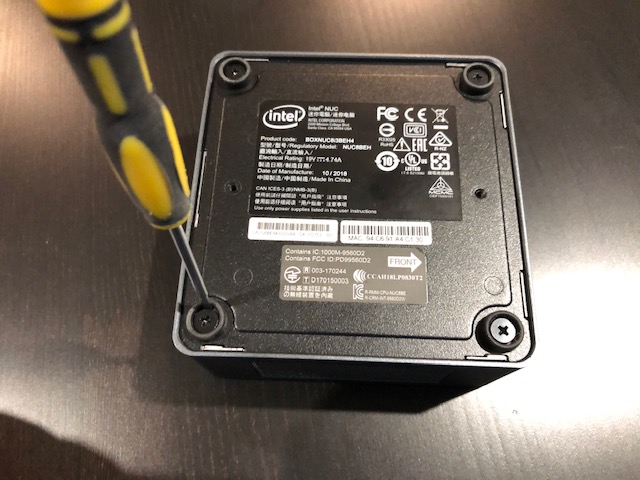
Unscrew the 4 retaining screws in the 'feet' (they won't come completely out). Once loosened you can separate the base (black) from the silver housing (top). You may need to pry it open using a knife or small screw driver. The black base has no electronics, its effectively an upside-down lid. Please note its orientation so you can fit the base back on completion.
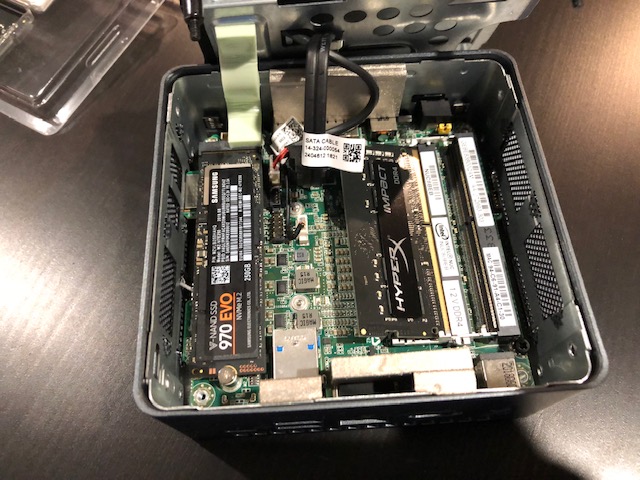
2. Once the base is off turn it up with silver top now on desk with all the electronics housed in this section:
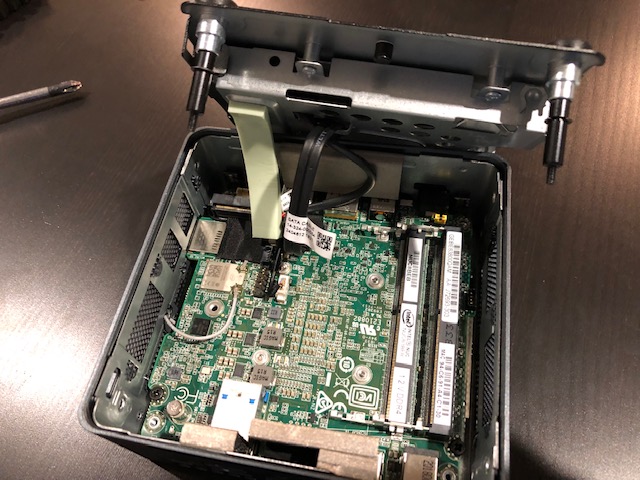
On the 4th Gen NUC (in these photos) you will see 4 long sockets. The SSD will fit into the short socket at bottom left of the photo above. The memory fits into the long socket(s) at right marked 1.35V DDR3L
3. Insert the SSD drive
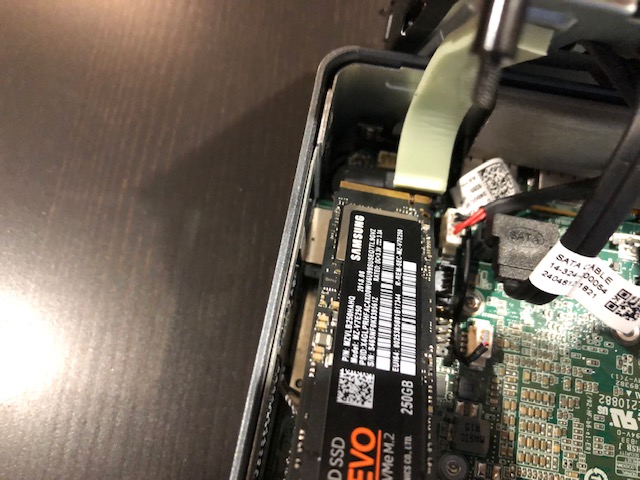
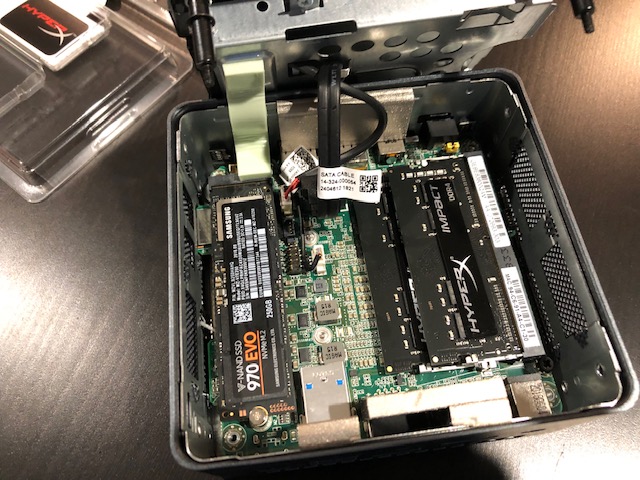
The SSD drive has a SATA style connector. Insert it as follows, but you'll need to unscrew and remove a small screw used to hold down the SSD (where the hole is at extreme top right of next picture)
Push gently and it will insert and cover all the pins. Now gently push it down to sit flat and screw in the retaining screw in the hole at opposite end to pins inserted (see above left)
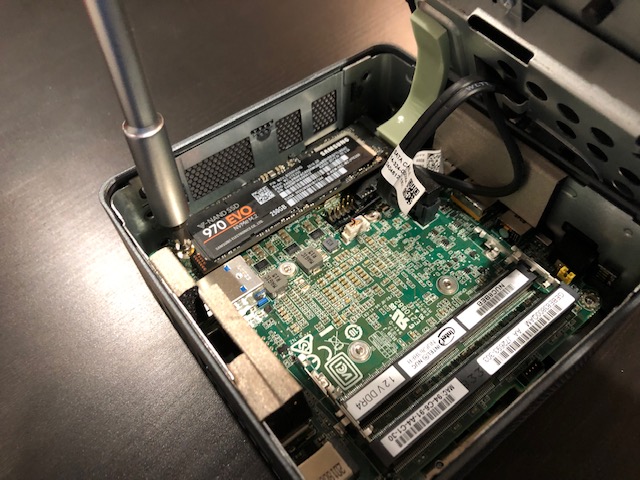
4. Insert Memory (NOTE: You may have one single RAM module or you may have two - fit whatever you have)
The black 'HyperX' memory module is a right above.
Slide first memory (RAM) module into the bottom memory socket (there are two connectors, one for each memory module), ensure the module is correctly oriented. Once inserted push the module gently down flat and it will click into place and be held down.
Now insert the 2nd memory module:
5. Reassemble the lid
Your done. Please place the top back on the black base (ensure this is oriented properly).
An Intel 8th generation NUC makes an ideal, relatively low cost media player. Its really small (4"/100mm square) has HDMI output and both wireless/Ethernet (1GBE LAN) connection, can be controlled remotely over you wifi network or via a 3rd party wireless or infrared remote control. NUCS support multichannel 192/24 7.1 audio and can play DTS-HDMA/TrueHD/Atmos audio via HDMI passthrough to an AVR and can play 4K UHD/1080p HD video.
NUCs come as a 'barebones' box. You will need to also buy memory and a small 'hard drive' (actually it will be a solid sate SSD drive - extreme speed). This is the recommended configuration which you can buy at Amazon or your local PC hardware store, this is the exact configuration I ordered:
https://www.amazon.com/gp/aws/cart/....3=B07BN5FJZQ&Quantity.3=1&add.x=127&add.y=26
There's no software included. You would need to install Windows (license required) or you can install LibreElec/Kodi (free). The latest LibreElec/Kodi Leia version now supports Hires Multichannel audio from FLAC.
If you plan to use LibreElec/Kodi I'd recommend purchasing a Minix Neo A2 air/gyroscopic mouse/remote (wifi) too. Amazon sells those for around $25. Here's all the bits including the Minix remote (memory at front, SSD drive, NUC at back).
https://www.amazon.com/MINIX-Keyboard-Six-Axis-Gyroscope-Technology/dp/B016OABW8S
EDIT: If you do use LibreElec it has iOS (iPhone/iPad) and Android smartphone/tablet remote control apps you can use via your home wifi to control the media player, select next tracks while listening to current etc. JRiver has similar apps for Windows and smartphones/tablets too. I don’t know about Foobar compatible remotes.
Once you've got everything you'll need a small Phillips head screwdriver to assemble the memory and drive.
This is my recommended
STEP 1: Install NUC components (NUC, memory and disc drive)
1. Turn the NUC upside down:
Unscrew the 4 retaining screws in the 'feet' (they won't come completely out). Once loosened you can separate the base (black) from the silver housing (top). You may need to pry it open using a knife or small screw driver. The black base has no electronics, its effectively an upside-down lid. Please note its orientation so you can fit the base back on completion.
2. Once the base is off turn it up with silver top now on desk with all the electronics housed in this section:
On the 4th Gen NUC (in these photos) you will see 4 long sockets. The SSD will fit into the short socket at bottom left of the photo above. The memory fits into the long socket(s) at right marked 1.35V DDR3L
3. Insert the SSD drive
The SSD drive has a SATA style connector. Insert it as follows, but you'll need to unscrew and remove a small screw used to hold down the SSD (where the hole is at extreme top right of next picture)
Push gently and it will insert and cover all the pins. Now gently push it down to sit flat and screw in the retaining screw in the hole at opposite end to pins inserted (see above left)
4. Insert Memory (NOTE: You may have one single RAM module or you may have two - fit whatever you have)
The black 'HyperX' memory module is a right above.
Slide first memory (RAM) module into the bottom memory socket (there are two connectors, one for each memory module), ensure the module is correctly oriented. Once inserted push the module gently down flat and it will click into place and be held down.
Now insert the 2nd memory module:
5. Reassemble the lid
Your done. Please place the top back on the black base (ensure this is oriented properly).
Last edited:


